Fancy Egg Cushion Craft
The woodland friends of Hazel Village celebrate a holiday called Egg Day every spring, in honor of how much they love eggs. Arthur Lamb is this year's Egg Day Bunny – quite an honor! You can learn just how the animals celebrate Egg Day (and all their other special holidays) in our blog post here.
Naturally, Arthur felt that his official title called for him to craft a special egg or two. But what sort of eggs should they be? As he often does when he has a big decision to make, Arthur decided to play a game of Baa-Ball with his best friend Lucas Rabbit. He always thinks best after a nice game, and fortunately Lucas is always excited to play. When the friends finished their game in the Lodge Field, they flopped down onto the ground to rest. And just like that, Arthur thought of it: EGG CUSHIONS! The grass was very nice, but wouldn't it be exciting to sit on top of a big fluffy egg? Lucas agreed it was the perfect idea, so Arthur jumped up and skipped off to gather his supplies.
He decided to make two egg cushions, one little and one big. The little egg would be for an animal to sit on or lean against while contemplating the splendor of eggs and thinking fondly of Egg Days past. The big egg would be for lounging upon after the egg-citing festivities of Egg Day are done, when it is time to cloud-gaze peacefully and think about how much fun was had. Arthur could hardly wait to share the cushions with his friends!

If you would like to make some fancy egg cushions of your own, this blog post contains separate instructions for the Little Egg and Big Egg. The Little Egg features some slightly more advanced embroidery, while the Big Egg is straightforward and beginner-friendly. But regardless of your experience level, we encourage you to try whichever egg calls out to you!
Little Egg

What you will need:
- 1 felt craft sheet
- Embroidery floss
- Embroidery hoop
- Embroidery needle
- Scissors
- Stuffing
- Pencil or embroidery marking pen

To get started, print our downloadable little egg pattern and cut it out. Trace the egg on one half of your felt sheet, and use your pencil or embroidery pen to sketch a design. (An embroidery pen will vanish with water, so it is an excellent thing to own if you are a frequent crafter.)

We chose a design with flowers and leaves, but you can embroider anything your heart desires. We would recommend using a larger embroidery hoop – we just happened to only have a tiny one handy. If your hoop is smaller than your egg like ours is, just work in sections and move it around.

We used a stem stitch for the flowers' stems, which creates a nice twisty-looking continuous line. You can learn the stem stitch here.

For the leaves, we made a lazy-daisy stitch on either side of the stem. You can learn the lazy-daisy stitch here.


We used the same lazy-daisy stitch again in goldenrod thread to make five flower petals at the end of each stem.

Lastly, we used a light blue thread to make a single french knot in the center of each flower. Learn this stitch here!

When your embroidered design is complete, cut out the egg shape. Trace another egg on your remaining felt to be the back side, and cut it out. Use a running stitch around the border to sew the two pieces together. We chose the light blue thread again, to accent the flowers' centers.

When you have a small gap left, stuff the egg before you finish sewing it up.

Now you have made an egg pillow! Huzzah!!


Big Egg

What you will need:
- 2 felt craft sheets
- Ribbons
- Embroidery needle
- Embroidery floss
- Stuffing
- Sewing pins (optional)
- Regular needle and thread (optional)
Do you have extra ribbon lying around from holiday gifts? This is the perfect craft with which to repurpose it! If not, then you can enjoy a delightful outing to your local crafts store to browse their ribbon section and choose a few that speak to you. You will also want to choose a color of embroidery floss that looks nice with your ribbons.

First, print your big egg pattern and cut it out. Trace the shape onto each felt sheet and cut out your 2 egg pieces.

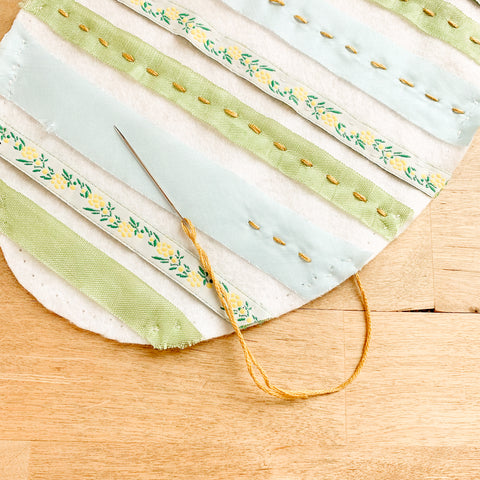
Arrange your ribbons in stripes on top of one egg piece. This is a great opportunity to play with color, width, pattern, and texture.

We used a regular sewing needle and white thread to stitch these ribbons down along the edges. This is optional! You can also use sewing pins to hold the ribbons in place while you embroider over them.

Thread your embroidery needle with embroidery floss and tie a knot at one end. Use a running stitch across your ribbons to secure them in place and add a decorative accent.
If you have any ribbons with pretty patterns that you don't want to cover up, like the yellow floral one on this egg, use a regular needle and thread in a matching color to stitch them down. You will also want to trim the edges of all the ribbons along the shape of the egg.
When your ribbons are sewn, place the beribboned egg on top of the plain felt egg. Use a running stitch again to stitch the two pieces together around the border, pausing when you have a gap of a few inches left to sew.
Fill the cushion with stuffing. Stitch the rest of the way around the border, and tie a knot.

You now have a splendiferous egg cushion!


Thanks for reading, friends!
![]()
Did you make this craft at home? Send us a photo or tag us on social media @hazelvillage! For any questions, please email us at hello@hazelvillage.com.
You might also like: