Flower Crown DIY Craft
|
Crafts
When Lucy Owl woke up this morning, she had an itch for a fanciful new item of headwear. Naturally she decided to make a flower crown. After her exercises – Lucy has a regimen of exercises for upper body strength, which she does every morning in front of her house – she gathered her crafting supplies and got to work.
Here is what you will need to make your own flower crown along with Lucy:
- 30” of ribbon for each crown you want to make
- Felt
- Embroidery floss
- An embroidery needle
- Scissors
- A marking pen or a pencil

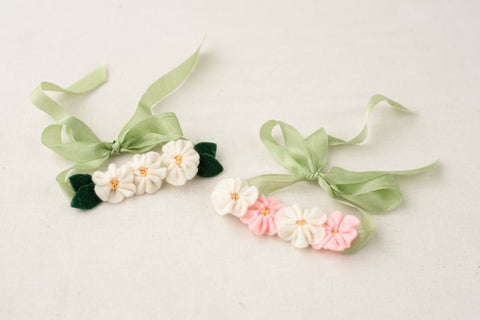
You can get small felt sheets at your local craft store. We chose pink and white for the flowers, and also got some green for leaves. The leaves are optional! (Or maybe you want to make a leaf crown with no flowers. That would be cool too.) Cut your ribbon to 30” and trim the ends at an angle to help prevent fraying.

Start your first flower by cutting out a felt strip of 6 scallops. We made a handy printable template for you! You can cut out the template and trace it on your felt. We used a water-soluble marking pen, but you can also use a pencil and just cut over the lines.

Next, thread your needle with a matching color and sew a running stitch along the bottom of your felt strip. Here is a quick how-to video for the running stitch.

Once your running stitch goes all the way from one end to the other, pull the thread and your felt will curl up into a flower shape. (Lucy says this part is particularly exciting.)
Pull the thread tight and stitch the two ends together, then tie a knot. You don't have to cut the thread here - use the rest of it to sew the flower onto the ribbon.

Mark the center of your ribbon and sew your first flower on.

You can make as many flowers as you want! We went with three, since we knew we were going to put leaves on either side. We recommend sewing the flowers close together so they will look snug and lush.

Once your flowers are attached to your ribbon, it's time to fill in their middles. We chose yellow thread for this and used a french knot stitch. This might sound fancy but we promise you can do it! Here is a helpful video tutorial. We made about 5 french knot stitches in the middle of each flower, then tied off the thread.

If you are adding leaves, cut out some leaf shapes from your green felt. You could also cut the edges in a zigzag for a serrated leaf – pinking shears would make this easy if you have them.

Overlap your leaves and tuck them close to a flower so that the bottoms will be hidden behind it. Then sew them to the ribbon with a couple of stitches.

And you're done!

Lucy was quite chuffed with her flower crown. "That was fun!" she said. "Now I will make another for my friend Juliette." Lucy put on her crown for inspiration and thought about what colors Juliette might like. (All the animals know that it's important to think about what your friend likes when you are making them a present.) She decided that pink and white was the answer. "No leaves, I think; an extra flower instead would be best."

Lucy carried the pink crown across the Village to Juliette's house and gave it to her friend. Juliette was so excited she had to hop around for a minute to get her energy out.

"I think this crown suits me!" Juliette declared. She thanked her friend and invited her inside to celebrate their new crowns with some blueberry muffins. Tasty!
![]()
Did you make this craft at home? Send us a photo or tag us on social media @hazelvillage! For any questions, please email us at hello@hazelvillage.com.
You might also like: