Festive Pom-Pom Garland Craft
The animals of Hazel Village have received a royal invitation to a most auspicious event: the Grand Ball of Princess Gertrude. This mysterious princess is due to arrive very soon, and the animals could not be more excited to greet her! Annicke Mouse thought this occasion called for special decorations. She decided a pom-pom garland would be just the the thing.

Scurrying to her cozy house, Annicke got out the special box where she keeps her best bits of yarn. Snowy colors seemed the way to go, and she had a feeling that Princess Gertrude would like them. (It was only a hunch, but Annicke knows to trust her instincts.) She selected two colors of yarn: one icy blue, one silvery white. It was time to get to work!
If you would like to make a pom-pom garland too, read on to find out how Annicke made hers. Once you try this craft, you will discover that just about anything can be made delightful with the addition of a pom-pom!

What you will need:
- Yarn
- Scissors
- A piece of cardboard
Crafting tip: we recommend having a pair of scissors that is just for fabric and yarn. Cutting paper dulls scissor blades pretty quickly, and it is no fun trying to cut fabric or yarn with dull scissors. At the workshop we label all our scissors with PAPER or FABRIC for this reason. ✂️
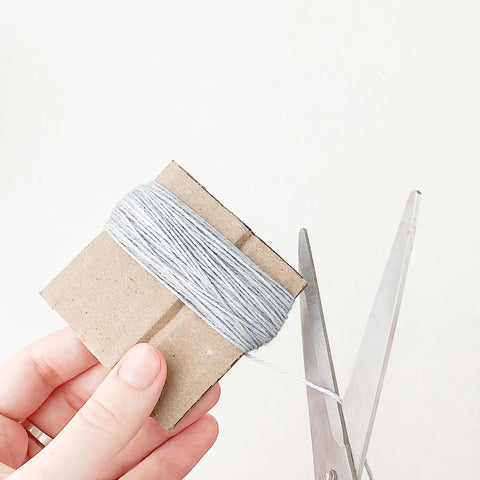
Start by deciding how big you want your poms to be, and then cut a piece of cardboard an inch or two bigger. We wanted our poms to be about 1.5", so we're using a piece of cardboard that's about 3". Don't worry about being exact for this; it is a very forgiving craft.

Wrap your yarn around and around the cardboard. The more yarn you wrap, the denser your pom will be. Once you have a lot of yarn wrapped, snip the end.

Next, thread a piece of yarn underneath one side and tie a tight knot around the middle. We just bent our cardboard piece a little to make this easier, but you could also use a yarn needle if you have one.


Repeat on the opposite side.

Next, wiggle the yarn off the cardboard. The knots you just tied will keep it neatly together.

Now tie a new knot securely around the middle of the whole bundle, and leave the yarn tails long.


Poke your scissors into the tunnel made by the yarn loops on one side, and snip through it. Repeat on the other side.


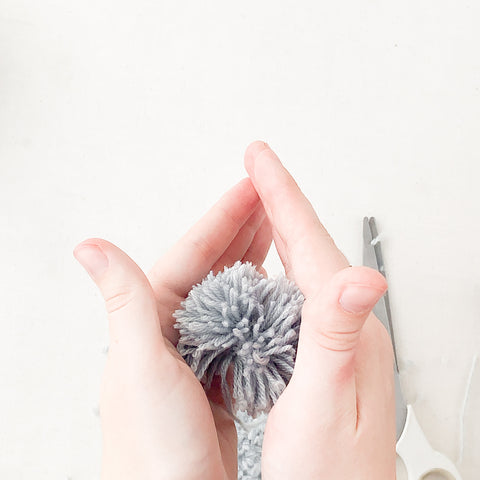
When you fluff up the yarn, you will have a pom that most likely looks a little messy and uneven. There is just one more step to making it fluffy and round: start trimming!

Snip the yarn all over your pom until you are happy with its shape. Don't be afraid to snip boldly – you may want to cut off quite a bit of yarn.

It can be helpful to roll the pom between your palms to round it out as well. Try to avoid cutting those long yarn tails in the middle, because you will need them later.

You might notice that our poms are not all that dense, and you can still see the individual pieces of yarn. This is just a matter of how much yarn you wrapped earlier, and how much you trim it down. You can make your poms as shaggy or as tight as you would like.

When you finish your first pom, just repeat the process to make however many you want for your garland. We made nine.

Once you have all your poms, cut a long piece of yarn to string them together. Using the long yarn tails on each pom, tie them to your garland string. Then trim the long tails short to hide them in the poms.

Space the poms out evenly, and you have your pom-pom garland!

Annicke asked Phoebe Fawn and Arthur Lamb to help her hang up her garland. Phoebe told her friend how nice it looked. Arthur asked, "Will you teach me how to make a pom?" "Of course!" Annicke replied. "I have lots more yarn. We will have a pom-pom party." What fun!

If you would like to attend the Grand Ball of Princess Gertrude, keep an eye on our Instagram and email newsletter for her Hazel Village debut. She will be arriving on Wednesday, November 15th at 1PM ET! ❄️👑
![]()
Did you make this craft at home? Send us a photo or tag us on social media @hazelvillage! For any questions, please email us at hello@hazelvillage.com.
You might also like: